fuzzgen build instructions

fuzzgen的完整安装过程和简单使用

fuzzgen&llvm

这部分github上有人提了issue,写的挺全的

1
2
3
4
5
6
7
8
9
10
11
12
13
14
15
16
17
18
19
20
21
22
23
#Clone Fuzzgen

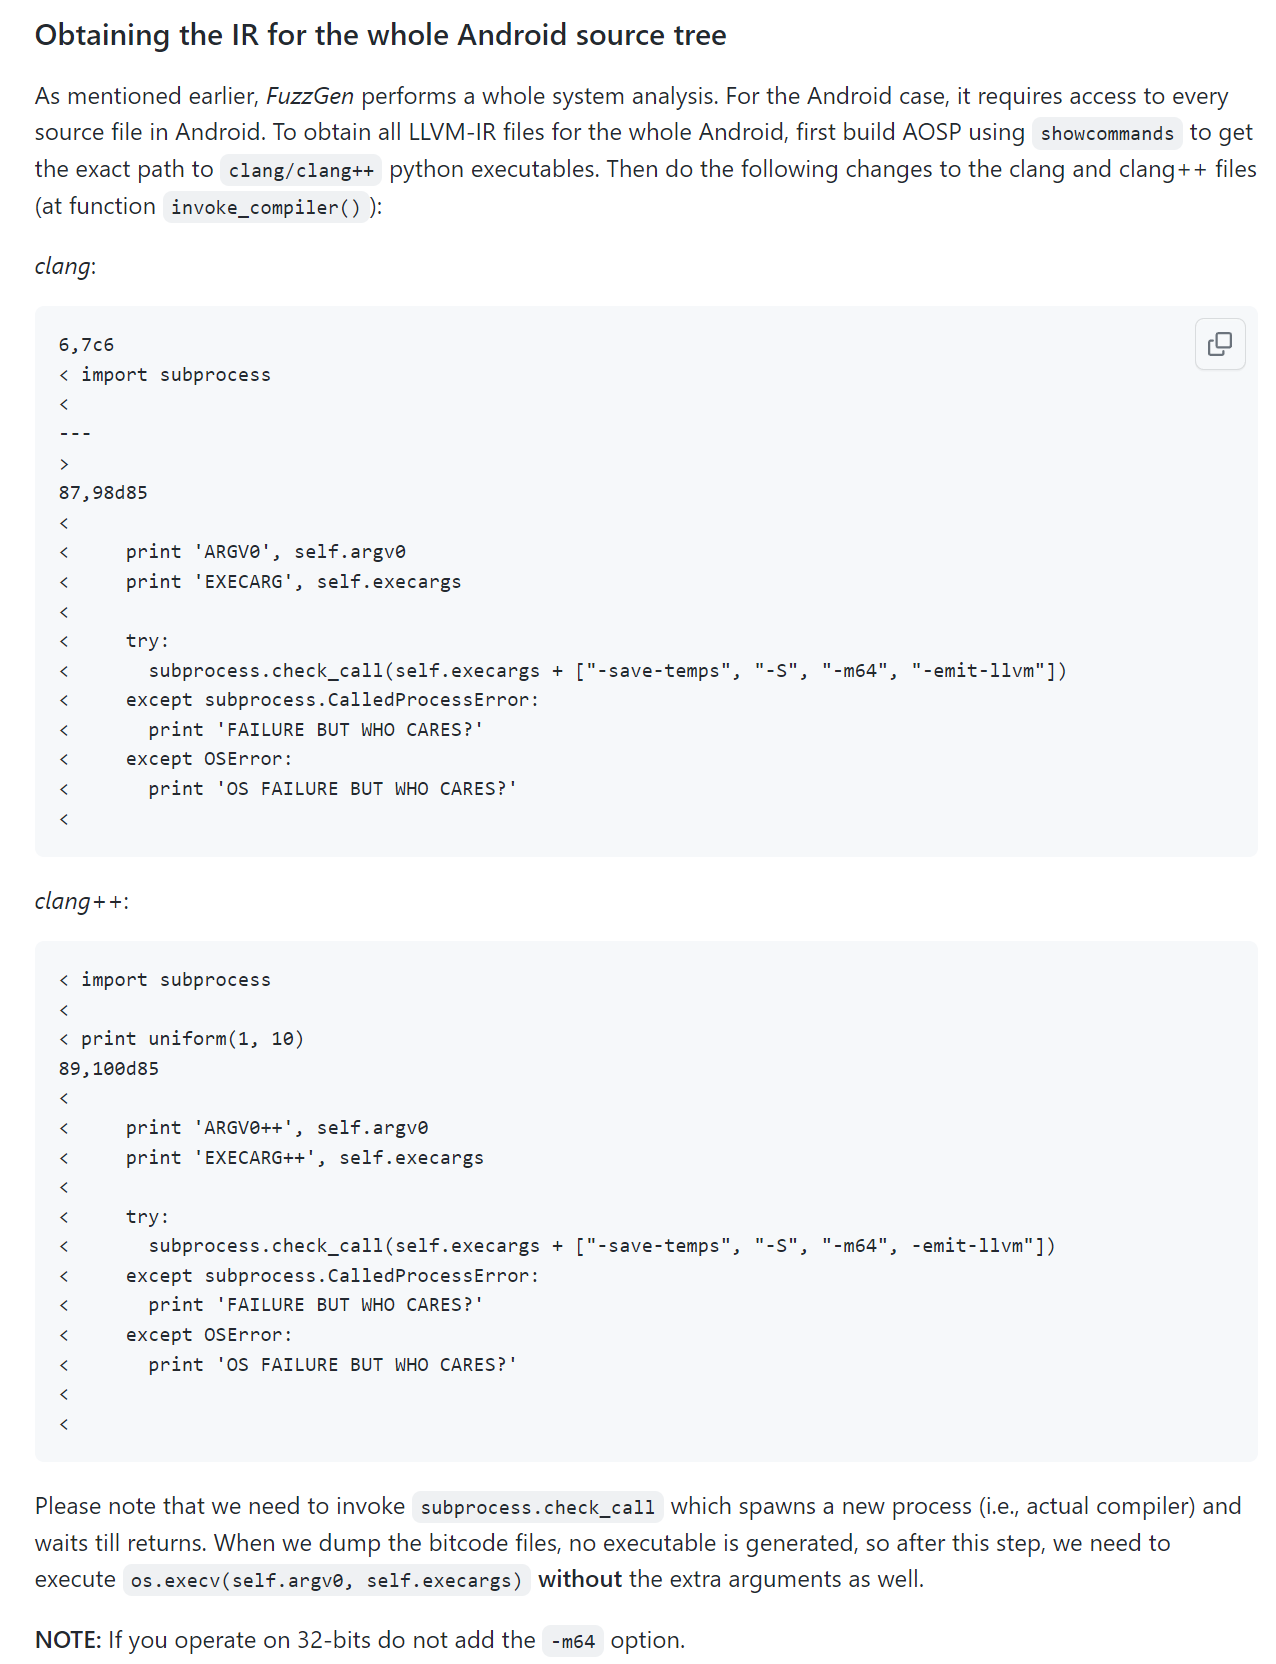
git clone https://github.com/HexHive/FuzzGen
#Build LLVM-6.0.0 (Taken from #19 and modified)

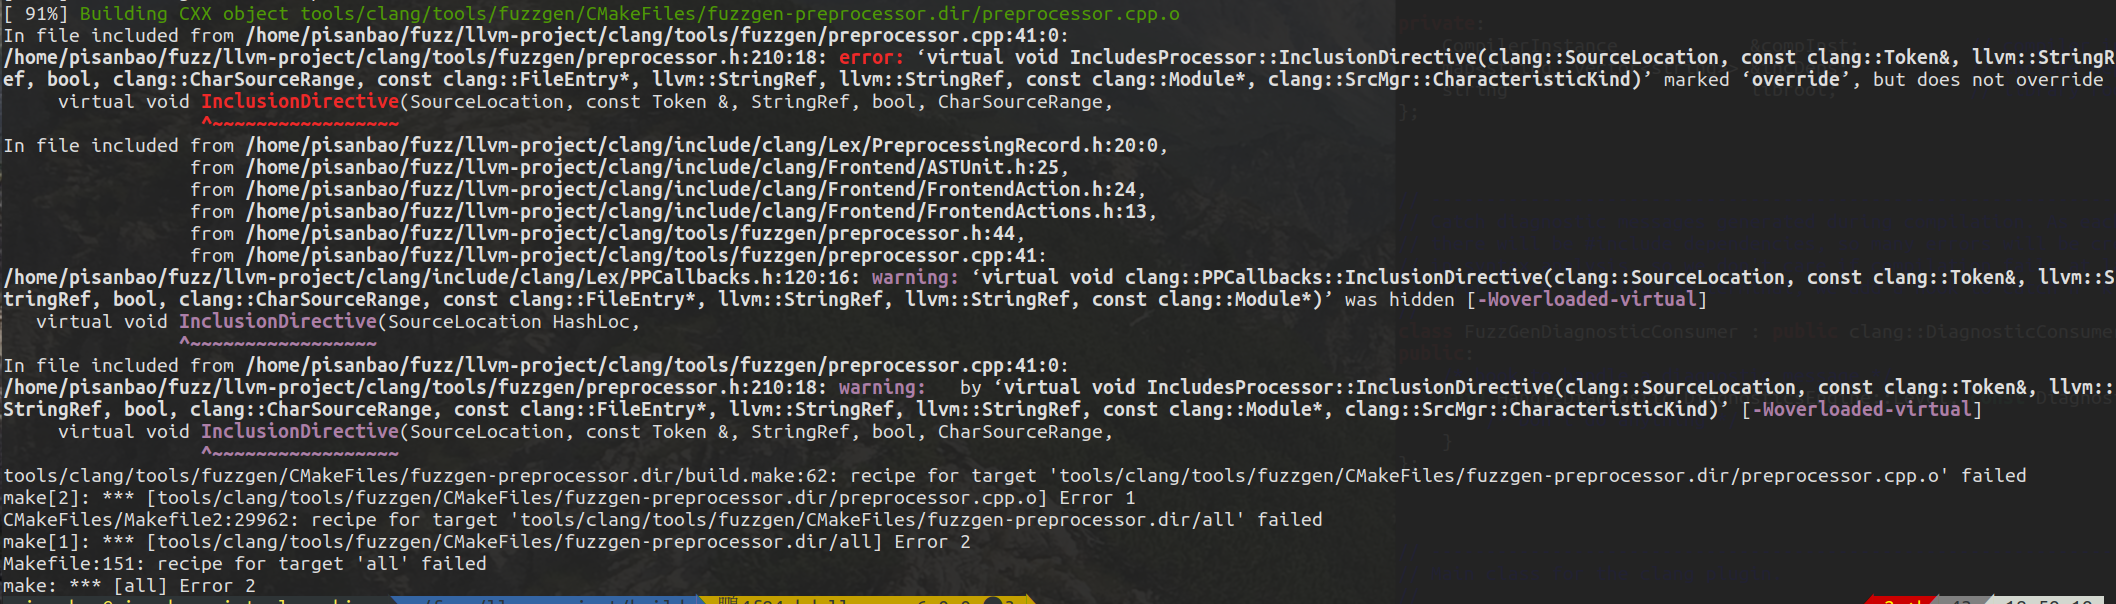
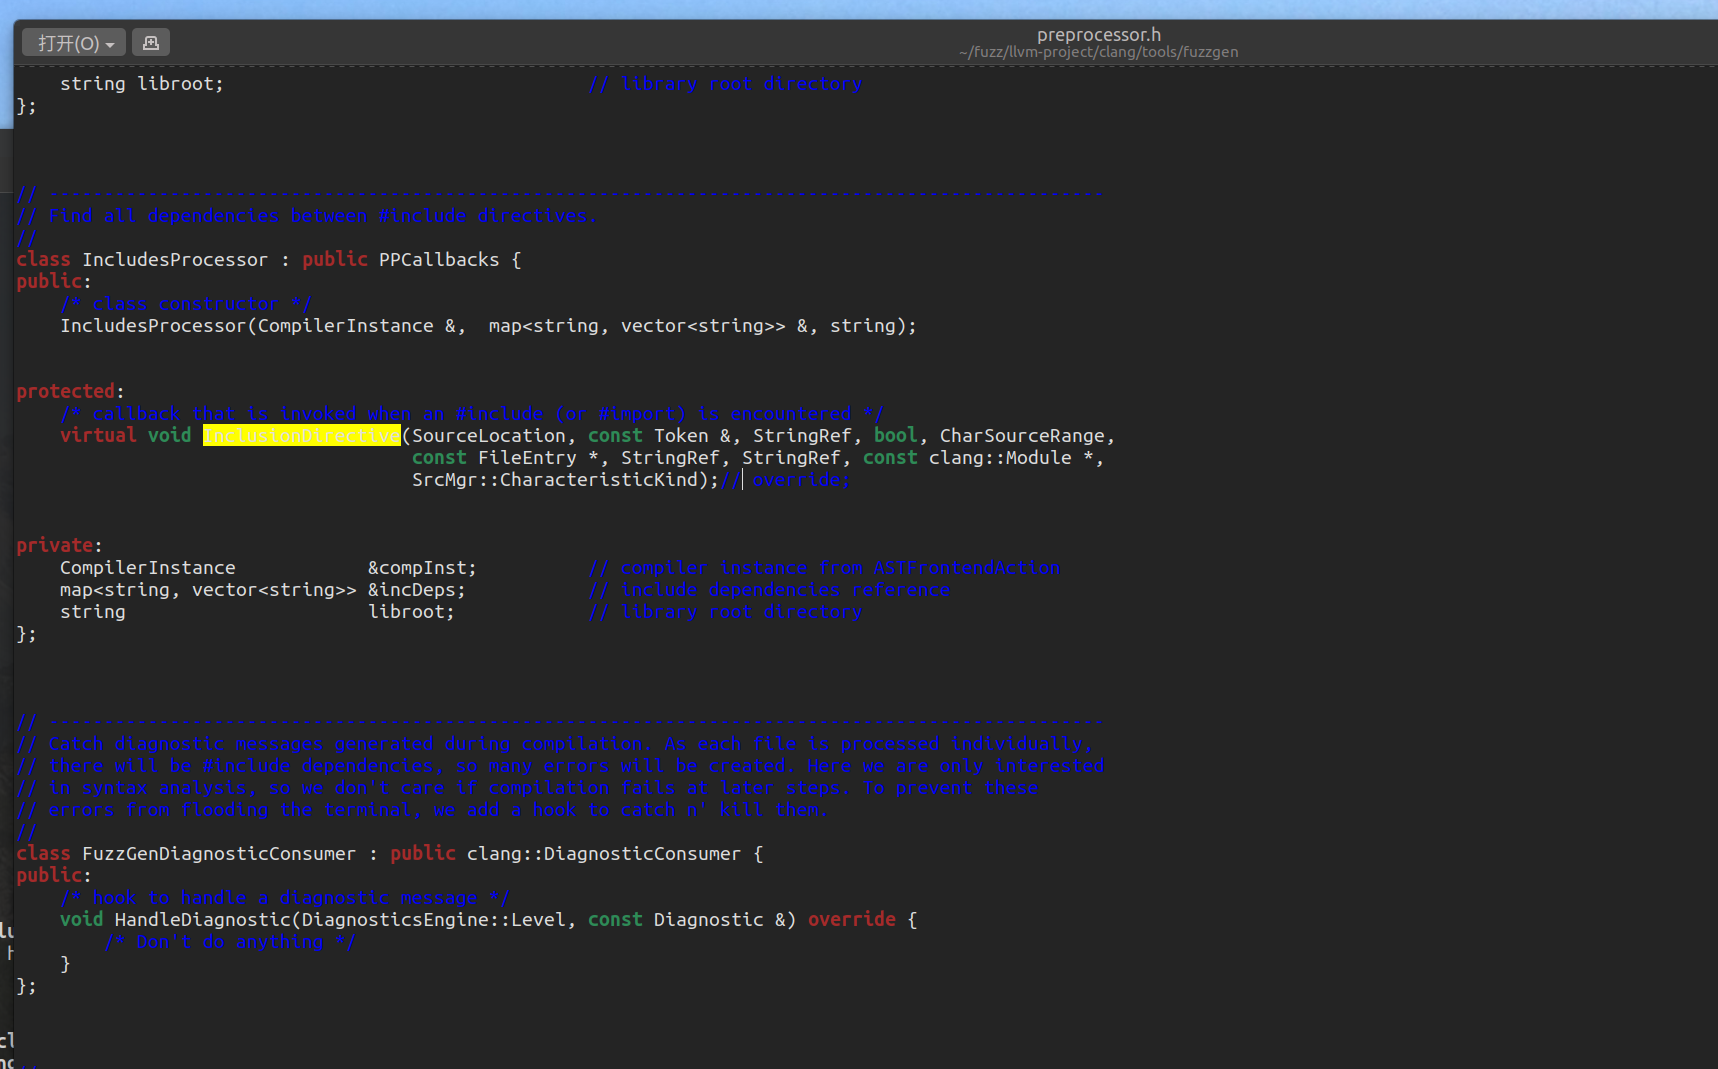
git clone https://github.com/llvm/llvm-project
cd llvm-project
git checkout llvmorg-6.0.0
cp -r FuzzGen/src/preprocessor/ llvm-project/clang/tools/fuzzgen/ (The Readme said $LLVM_SRC/tools/clang/tools but there is no tools directory in llvm-project/)
#Open llvm-project/clang/tools/CMakeLists.txt and add add_clang_subdirectory(fuzzgen) (anywhere in the code or preferably at the end?)
mkdir build
cd build
cmake -DLLVM_ENABLE_PROJECTS=clang -DLLVM_PARALLEL_LINK_JOBS=8 -DLLVM_USE_LINKER=gold -DCMAKE_BUILD_TYPE=Release -G "Unix Makefiles" ../llvm (setting parallel link jobs to 1 and using the gold linker are optional but supposedly easier for the RAM and shouldn't use as much swap memory)
cmake --build . (may take several hours to complete - 5-6 h in my case; setting the build type to Release should speed up the process a bit, though)
#Build FuzzGen (Taken from the Readme and modified)
(1. FuzzGen has already been cloned beforehand)
2. sudo apt-get install libboost-all-dev
3. export LLVM_DIR=/llvm-project/build (not really optional, right?; targeting other versions will fail later on; is it necessary to specify the exact build directory, that had been created while building LLVM-6.0.0?)
4. cd FuzzGen
5. mkdir build
6. cd build
7. cmake ..
8. make -j$(nproc)

期间有个问题,在build fuzzgen的时候可能会报错,如下

image-20220226193148380

打开preprocessor.h吧下面的override注释掉即可

image-20220226193118645

AOSP

下面是编译安卓,这边一定要注意,安卓的版本要选Android9左右的,如果编译安卓使用的clang版本与编译fuzzgen所用的不同的话,后续会报很多错。

1
2
3
4
5
6
7
8
mkdir aosp
cd aosp
export REPO_URL='https://mirrors.tuna.tsinghua.edu.cn/git/git-repo/'
git config --global user.email "psbazx@gmail.com"
git config --global user.name "psbazx"
repo init -u https://aosp.tuna.tsinghua.edu.cn/platform/manifest
repo init -u https://aosp.tuna.tsinghua.edu.cn/platform/manifest -b android-9.0.0_r8
repo sync

接下去直接build即可

1
source build/envsetup.sh

image-20220226194101560

可能会报错,因为我这用的是zsh,输入 /bin/bash 换成bash即可

image-20220226194214980

这部分操作在你想要生成bc文件的库那加上参数即可,我这边使用的时候报了参数过多的错误

image-20220226194309944

1
2
3
4
5
cflags: [
"-save-temps",
"-emit-llvm",
"-m64" // for 64 bit data layouts
],

吧-S去除即可

image-20220226194412907

这一部分修改在/aosp/prebuilts/clang/host/linux-x86/下

image-20220226194612287

可以看到很多clang-开头的目录,一般的话都是在最后一个,当然不嫌麻烦可以把每个都改了。验证llvm版本也可以通过这边,提前看下llvm版本是不是6.0

//本人不太会安卓,纯经验

1
2
lunch aosp_x86_64-eng
make -j8

喝杯咖啡坐等结束

image-20220226194858828

编译完后可以看到很多.bc文件在根目录下

先用llvm-link把需要的整合起来再用llvm-dis生成.ll文件即可

Usage

生成meta文件

1
./bin/fuzzgen-preprocessor  -outfile=libvpx.meta -library-root=/home/pisanbao/aosp/external/libvpx/libvpx/examples/ *.c

生成fuzz stub

1
./fuzzgen -mode=android -analysis=deep -arch=x64 -no-progressive -lib-name=libvpx                   -meta=libvpx.meta -consumer-dir=../../../桌面/temp/123/ -lib-root=~/aosp                   -path=external/libvpx -outdir=fuzzers/libvpx -static-libs='libvpx'                   libvpx/consumers/libvpx.ll

image-20220226195550414

image-20220226195310211

过段时间再写下fuzzgen这篇论文的读后感了。主要是想借鉴下里面生成fuzz stub这块。


fuzzgen build instructions
http://www.psbazx.com/2022/02/27/fuzzgen-build-instructions/
Beitragsautor
皮三宝
Veröffentlicht am
February 26, 2022
Urheberrechtshinweis